Lab 2 Bluetooth communication
The goal of this lab was to get the Artemis connected to our computer via bluetooth to send commands and recieve data.
Setup
To get my computer ready for this lab, I ensured that I had Python 3 and pip installed. I created a project directory and set up the virtual environment in it. I then installed numpy, pyyaml, colorama, nest_asyncio, bleak, and jupyterlab. I copied the provided codebase into the directory and read through it.
On the Artemis side, I installed the ArduinoBLE library, and uploaded the ble_arduino.ino file from the codebase to the Artemis. This sketch printed the MAC address of the Artemis.

Codebase
The codebase contains files for the Artemis and computer side.
The Artemis side is in Arduino, there is a file that formats character arrays, a file that facilitates in sending and receiving data using BLE methods, and a file that responds to various commands.
The computer side is written in python. A UUID or MAC address is used to connect this side to the Artemis side. The ArtemisBLEController class provides functions that allow the sending and receiving of data between the Artemis and Computer.
The Arduino code is uploaded to the Artemis. When the artemis updates a characteristic in the BLE service, the computer side can receive that information. The computer can also send commands to the Artemis.
Bluetooth Connection
To get the Artemis connected to the computer via bluetooth, the first step was to define the addresses. The connections.yaml file was used to store addresses used for bluetooth connection. I added the MAC address of the Artemis (retrieved in prelab). I then generated a new uuid using the uuid4() function. I added this uuid to connections.yaml and ble_arduino.ino.
I initially tried to connect using the uuid but this was unsuccessful, the computer either would not connect to the Artemis or the connection only lasted a few seconds. I resorted to using the MAC address, the only con of this is that there could be another Artemis with the same address. I, however, did not face any problems with this method. I ran the demo code (demo.ipynb) multiple times to ensure the connection was robust.
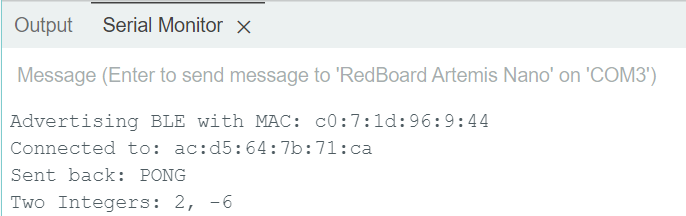
Here are the outputs from each cell showing that the connection was successful.


On the Artemis side, this was the output to the serial monitor.
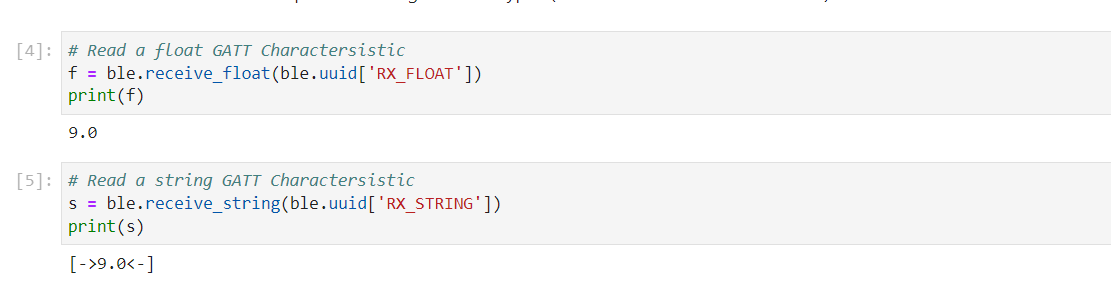
Send ECHO Command
The first task was to write the ECHO command. This command sends a string from the computer to the Artemis and the artemis sends back the string after adding "Artemis Says:" to the beginning. This was implemented by adding a case in the ble_arduino.ino and then calling the command from the python side.

Get Time Command
I then added the command GET_TIME_MILLIS that when called, the Artemis sends a string displaying the time in millis to the computer. I added GET_TIME_MILLIS to the cmd_types.py file and the command types enumerator in the arduino code. A case was added to the ble_arduino.ino and then the command was called from the python side.

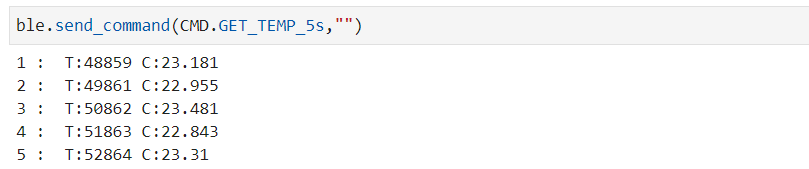
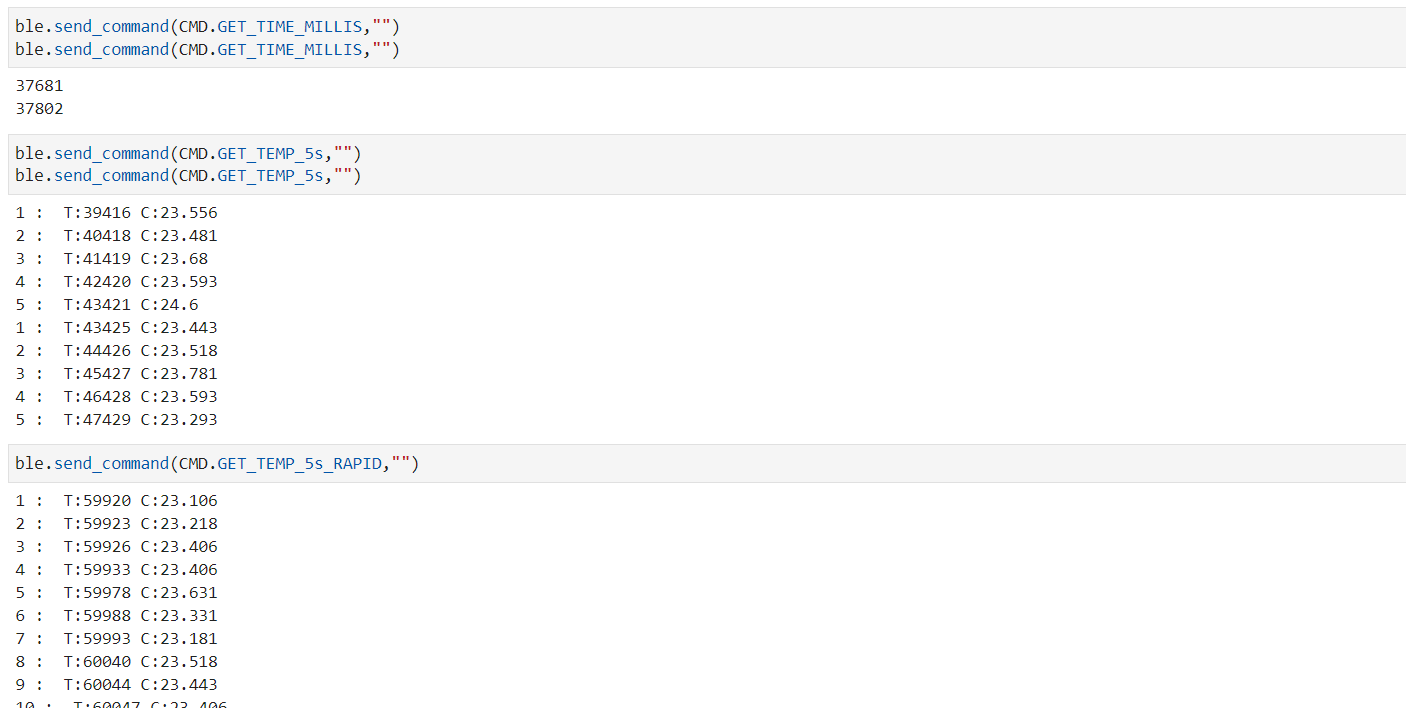
Get Temperature Command
Two temperature commands (GET_TEMP_5s and GET_TEMP_5s_RAPID) were written. When these commands are called on the computer side, the artemis sends back a time stamped temperature reading from the on board sensor. I added both commands to the cmd_types.py file and the command types enumerator in the arduino code. Cases were added to the ble_arduino.ino for each and then the commands were called from the python side. The notification handler (discussed later) handled taking the outputs from these commands, formatting them, and printing them on the arduino side.
The GET_TEMP_5s command sends 5 readings 1 second apart. Each reading is sent 1 at a time. A while loop was used to keep track of the number of readings, and delays were used to space them 1s apart.
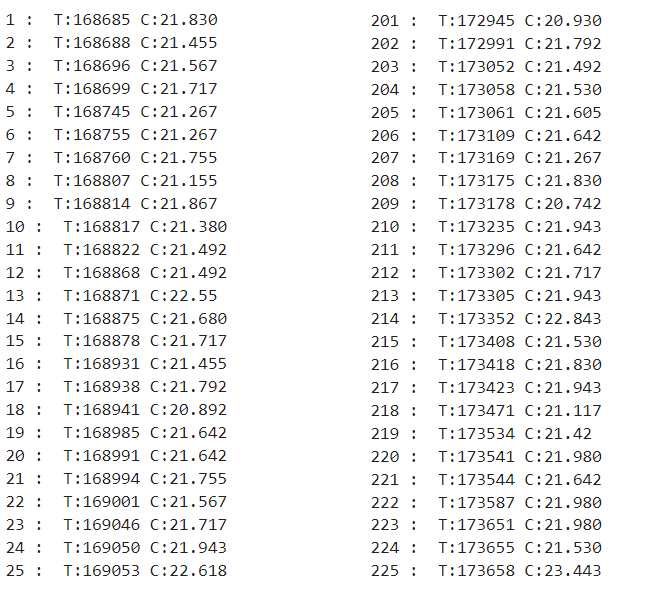
The GET_TEMP_5s_RAPID command sends as many readings as possible in 5 seconds. Millis were used to keep track of the time elapsed in a while loop. Each reading is sent 1 at a time. Between 200 and 350 readings were usually taken. In this example, 250 readings were taken, the image shows the first 25 and the last 25, notice the time stamps to see that the first and last are 5 seconds apart.

Notification Handler
I wrote a callback function for the start_notify function. It received the string value sent from the Artemis side, formatted it and printed it. It took in the string uuid and the byte array as inputs. This way whenever a string was received, it was automatically formatted and printed. The function was initially written for the GET_TIME_MILLIS command and simply extracted and printed the time ("T:" was removed), but as the temperature functions were added, I modified it to format the output from them as well.
The call back function took care of the GET_TIME_MILLIS command separately by checking whether there was a "C" in the bytearray, an absence of a "C" indicated that just millis were sent so the time was extracted and printed.
For the temperature functions, I created a counter and printed the count alongside the reading that was sent, this allowed each reading to be numbered and displayed nicely. I modified the case statements in ble_arduino.ino for the temperature commands to send "END" after it completed sending the temperature readings. On the computer side, if "END" was received, the counter was reset and nothing was printed until the next command was called.
Code to send "END" added
Limitations
At 150Hz, 5 seconds of 16-bit values is 12,000 bits (150*5*16). The board has a 384kB of RAM, which is 3,072,000 bits (384*8000). This means 256 sets of 5 second 16-bit values can be stored (3,072,000/12000). This is assuming that all the RAM is available which is not the case, some space is allocated to the program, if we assume that about 5% is used up, then this takes us down to around 243 sets.