Lab 12 Path Planning and Execution
In this final lab, we use everything we have worked on thus far to make the robot navigate to certain waypoints in a maze.
Planning
We were tasked with hitting the following waypoints:
- (-4, -3) <--start
- (-2, -1)
- (1, -1)
- (2, -3)
- (5, -3)
- (5, -2)
- (5, 3)
- (0, 3)
- (0, 0) <--end
In order to do this, I decided to start off with PID control as it seemed to be the most robust based on my previous labs and the most time efficient since I had quite a busy end of semester. I did want to use localisation since I had great localisation results in lab 11 but I decided to get PID working before attempting this.
I started off by planning the optimal route to take. Most waypoints are 90° offset from each other which means that the robot will be travelling perpendicular to a wall. Waypoints 1->2 and 3->4 would require the robot to face the wall at an angle. After reading Ryan's and Robby's pages from last year and talking to some people in lab I decided that instead of trying to turn at an angle I would adjust the route so that only 90° turns were executed and the robot was always perpendicular to a wall.
The following is the route I planned
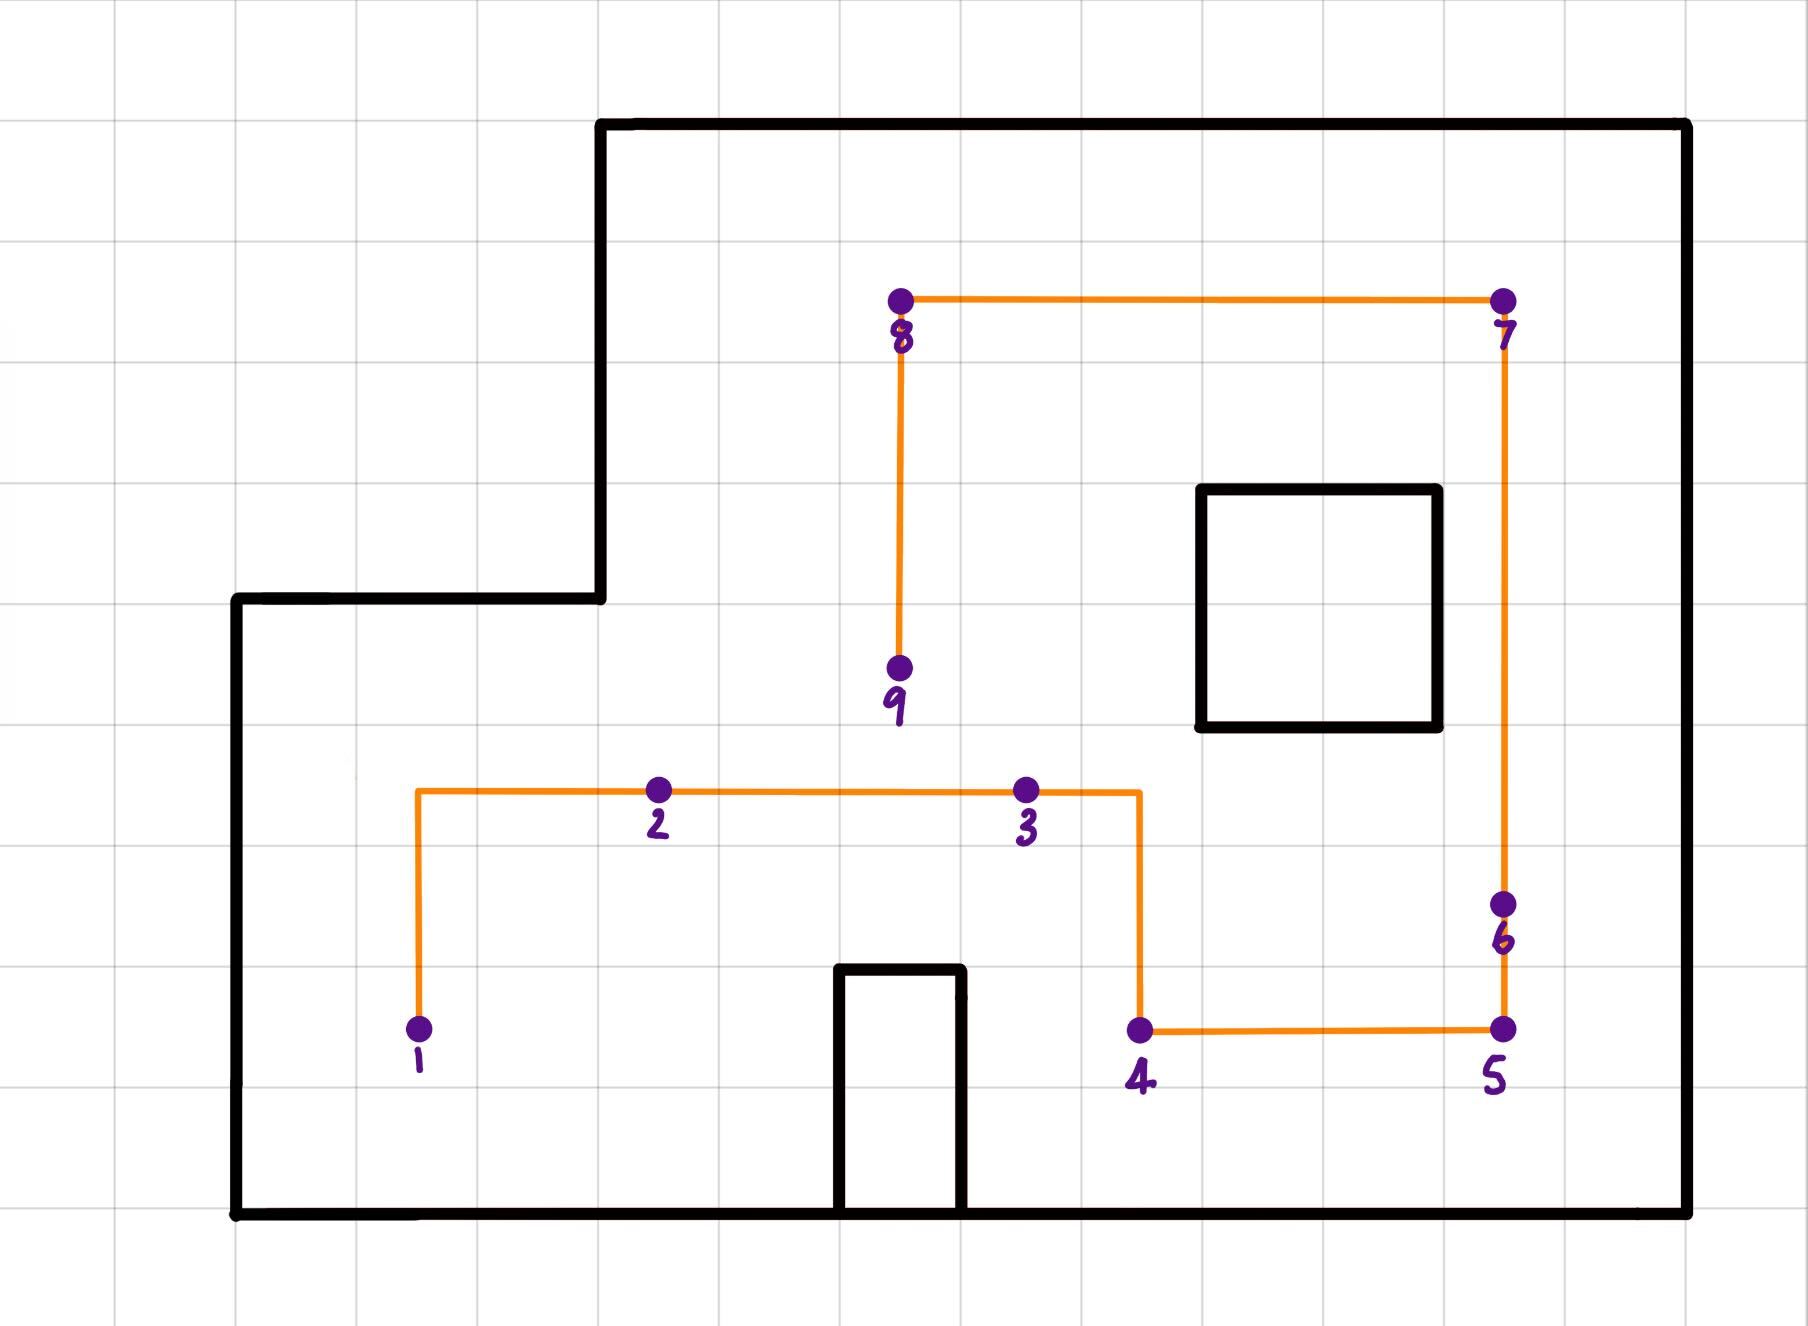
The next step was to take measurements to determine the PID values. I went off the number of tiles knowing that the edge of the square tile was 304mm. These values continued to be tuned as I ran trials because in order for the robot to be at the waypoint after turning, the target distance needs to be further north of the waypoint. These are the values I landed on.
All values are in mm. I accidentally wrote "m" for the first value.
(P)ID
For the straight stretches I used my PID code from lab 6. Since I was not worried about speed for this lab I did not use the Kalman Filter. This controller used distance from the ToF as inputs and a proportional controller to reach the target distance. A kp value of 0.04 was used. This controller was incredibly robust and was working perfectly.
For the turns I considered using open loop turning because I did not have orientation control implemented but the lab surface and the battery drain played very large factors in the amount of time needed to complete a 90° turn. So I decided to use PID orientation control to have a more robust solution. This took some more time to implement as I had not used it yet. This controller uses gyroscope readings from the IMU and a proportional controller to reach the target angle. A kp value of 0.9 was used.
I added cases to respond to commands sent from the computer side and receive the target values. These cases read the sensor values and runs the PID controllers for 5 seconds.
The turning controller was not extremely consistent, the condition of the lab floor played a very large role in how much the robot would turn. I tested it in the same spot multiple times before putting it in the arena. My results were great with the robot turning to the exact angle I asked it to. In the arena however, at each waypoint it seemed like the target had to be set to an angle between 80 and 90 in order for the robot to turn exactly 90°. Luckily at each waypoint, the angle needed seemed to stay consistent between runs but because of the number of people needing to use the arena during lab hours, it took a long time to tune each of the angles correctly.
Computer Side Commands
The computer side code for this lab was very simple as I was not receiving data. I sent commands to prompt the robot to move to each waypoint. I had a separate cell in my jupyter notebook for each waypoint so that I could test my system in pieces.
Results
This video is three separate runs spliced together. The first run was stopped since my laptop died during the run and the second run we decided to reset because our angle tuning was not great and the error would compound for the last two waypoints. Because there were so many people waiting to use the arena we started each new run at the spot it previously failed so that we could run the robot in the back half while other teams ran theirs in the front half.
This was the best consecutive run we accomplished, we had to manually adjust the robot at 2 points. The first was because the robot spun off axis too much when turning and was detecting the box instead of the wall. The second was because at way point 7, the robot spun out of control when executing the orientation PID. This was something that happened every now and then and the error was not consistently replicable which made debugging very hard. Both Tobi and I faced the same error in the code that we wrote alone. When this error happened it caused the distance PID to stop working as well. We spent a lot of time trying to figure out what the issue was but we were unsuccessful. We wanted to at least isolate the issue so that the distance PID would not be affected by making sure there were no shared variables. This did not seem to help. We were also tuning angles as we went in this run to collect data for the proceeding runs.
Acknowledgments
Tobi and I started off this lab working alone but when we realised that we both had similar code we decided to work together to debug and tune to get a better run.
I referenced Ryan’s and Robby's pages for guidance on this lab. Thank you to Kirstin and all the TA's for hosting so many open lab hours and being so helpful in getting this lab done.
This lab concludes the course. It has been a great semester gaining exposure to so many building blocks of robotics, definitely my favourite class I have taken so far.